Category Archives: Uncategorized

Tools

Most of the last few months has been occupied with sorting out my new house and work spaces as well as picking up a few new skills. This process is still ongoing and most of it is for another post but it has occurred to me while gathering the things I want for my studio/workshop that I have a strategy for buying the tools I need. So what I would like to consider here is tools, specifically obtaining them.
Tools are needed by almost anyone who makes things. Human fingers, although amazingly multifunctional, are really the jack of all trades and the master of none and so to do almost anything really really well we need tools of one form or another.
I am mainly considering power tools here as they are generally more expensive and therefore more thought goes into their purchase but the same philosophy can be applied to hand tools too and to other things in general.
Unless you are fortunate enough to find them or find someone who will give you them, you are going to have to buy them or make them and this provides you with, as I see it, broadly four options.

1. Buy new, good quality
2. Buy new, dubious quality and improve
3. Buy second hand
4. Make

If you are running a successful business with staff that are fully utilised and more potential work than you can fulfil, then number 1 is what you should do. All the time taken up by the other 3 options will end up costing you more than you save.
If, like me, you are doing this for yourself to learn and for the fun of it, it’s not so clear cut. So here is my decision process.

If I can make it and what I end up with will be as good or better than I can obtain elsewhere, that’s always my first option. I’ll learn a lot about the tool and about what features it needs and have the ability to produce something that does the jobs I need it to do. Most things these days fall into either the category of low volume/high price or high volume/low price where, once one sets profit as side, in the former you are paying for someone’s time to make it and the latter is pretty much all material costs. Things in the first category also tend to be less available on the second hand market so buying there is often not an option. Also since the price is high because of their small market, buying materials to make one can easily cost a fraction of the finished unit so if you are willing to trade your time building for a saving, you can do quite well. I wanted a potters wheel and the cost of buying one was prohibitive, even used. They are not that complex so building one seemed like the best option and, so far, it seems to work well. (I’ll write a post about designing and building that at a later date) Things in the second category can be the opposite and economies of scale can lead to the strange situation where the material cost would be higher than an off the shelf unit. Fortunately their ubiquity makes second hand a viable option. Imports tend to also fall into the low value/high quantity bracket and I’ll deal with them later on.

For more common things the second hand market can be a great boon to the small time workshop owner. Ebay is usually where I start my search for most things I buy on-line. Many popular industrial machines are available used at a fair price, especially things that are bigger and heavier than a your average Amazon box because people know it won’t fit in a letterbox but rarely realise they are still postable: ‘collection only’ can be great. I have had some amazing deals on things that people didn’t want to post but were just round the corner or they know what they had. Both my horizontal and standard band-saw, kiln and many other things have come to me this way. Generally whatever you buy will need a bit of work but it’s nowhere near as much as building something from scratch. Ebay is also of course a good place to buy cheap imported things straight from where they come from, although other sites are arguably better.

Some things are not available second hand at a sensible price. I also wanted a spindle moulder and that is a different matter all together. All the old ones are expensive and snapped up by carpenters and woodworking firms or were too far away. The speed of the spindle makes them quite dangerous things if they decide to go wrong and building one would require quite a bit of effort to try to minimise the error in the trials. This led me to option 2. Buy a Chinese import.
Some Chinese imports are better than others. They are generally designed to be “good enough” (from both the point of use and manufacturing ease) so for occasional use they are fine. They tend to provide the minimum you need to do the job and they can be quite Victorian in their use of large bits of cast iron. This means that they are ripe for the modifying. The solid castings give good rigidity (although occasionally are a bit thin) the folded steel of cabinets is easy to weld to and their general simplicity makes replacing components with ones of your own design quite straightforward. Also they are generally knock offs of successful models so they have actually been tried and tested more than you might think. The quality of finish can be anything from very good to dire. There are companies who do good business importing Chinese machinery and then finishing it and selling it, occasionally, as their own. When buying from this pool of imports it is important to realise that the same product will be offered at a number of different price points buy different suppliers. For some of them you are buying the name, others the backup of a company that cares about it customers and many, I’m sure, that are just trying to fleece you. Other companies will have the same item on eBay at say £100, £350, and £10000 with the idea that you will think that the top price is someone trying to screw you over, the bottom one is a knock off or fly by night company and the middle one must be the right price. This is goldilocks pricing. Unless you can actually see and poke the thing you are about to buy it can be a bit of a gamble. For some things the core will be well done but the ancillary bits are where they have cut corners, others will be poor throughout and some are amazingly well made. Much like second hand, I always expect to have to do something to make a cheap import good. It should also be noted that various companies import items as part of their product range and have them branded with their logo and colours but they insist on slightly higher than normal standards from the manufacturers and also tend to go straight to the factory and cut out the middle man so are usually the best kind of company to go to if you want an import. There is also the question of expected use. A tool that I expect to use for one job does not warrant the cost of buying a big name high quality item. This means I do buy things from low end hobby market companies when I know I only have limited use for it. Maybe I’ll find more things to use it for but if that happens and it looks like it’s worth an upgrade, then I haven’t lost a lot of money.

If it’s something I think I am going to use A LOT like a cordless drill, then I buy good quality and new. Yes you could buy 4 cheapo ones for the price of a good one but as I buy about one a decade would a cheap one last for 2 and bit years and could one get new batteries for it 8 years into its life? Also will it have the power and the ability to be used to its limits regularly? The other time I go for brand names is if they aren’t that much more than the cheep imports. Sometimes they have had to compete so much that their price point is quite competitive. Interestingly a moderate size company making a good product might have to sell a product with a thin margin to get any sales where as a foreign, low cost item might be sold with a large mark-up so there is no real reason to buy the lower grade product. If looking at these imports it’s always good to see it in real life first if possible, if not finding some reviews can be good too. A word of warning though; almost all companies make duff products and nearly every large brand has done “badge manufacturing” where you buy a product, put it in your own colours and slap your logo on it and sell it as yours own, as I mentioned before some companies even do this almost exclusively. Also brands are bought and sold and the good will of a brand name can be used to sell poor quality at a high mark-up. This means that if you buy from a reputable name it does not follow that you always get a good product. Always do some research.

Still you might ask why you would ever want to buy anything but the best. Go onto any web forum on any subject that involves buying tools and you will find people being slated for even suggesting anything but  American,  British,  German….(or other developed country for that matter.) have any value at all. There is the professional snobbery of “oh that’s just a hobby machine”, or “no tradesman would use that”. But I feel there are two very good and one quite good reason to buy substandard and do it up yourself. Firstly cost, not only will the average Joe not have thousands to spend and if you are still learning, you will make mistakes and just occasionally one could damage or catastrophically destroy a machine and better doing that and wrecking a cheap machine than an expensive one. Sure once you are happy you know exactly what you are doing and you are doing it regularly enough with enough income to buy something better, go for it and buy a shiny new thing with bells and whistles.

Secondly learning on something basic will also teach you much much more. A tool that does everything for you is nice but you don’t learn nearly as much. Without failure there is no learning and pushing a simple tool to its limits will tell you much more about how it works and how the process and the material interact. In the long term it will also inform you as to which bells are worth paying for.

The third reason is that the act of modifying, improving, repairing and and fiddling will result in a tool that does what you want. Most tools are made to do a bit of everything well. Go to any factory and you will find they have customised tools to do what they want a little bit better. You are never going to use any tool to do all things it can do, but you will use a subset of its abilities. For this reason making it your own can yield great improvements.

So you can either pay a lot and just buy all the shiny things and perhaps have all the kit and not a clue or start at the bottom and work up. But I’m sure there are those who will disagree.


Edit: fixed grammatical and spelling mistakes,18/02/16

Moving

Sometime in December I got a new job. It is at the other end of the country and so I had to move. My workshop all got packed up and now we are in a new house it is yet to get unpacked again. All this has meant I haven’t done anything arty for a few months other than the odd bit of sketching and an attempt at digital sculpture. However the setting up of a workshop is coming closer so soon I should have some new stuff to post about. Until then I shall continue my box wrangling.

Printing tiles

I think I have finally got the hang of printing tiles. It probably took me about 200 tiles to get the process to give good repeatable results. So I thought I would document the process for anyone else looking to do something similar.

Some of the results can be seen here:

cats, more cats, birds, QR codes

To sum it up in one line I use screen print technique with vinyl masks and under glaze in acrylic medium.

The process starts with underglaze powder which I get from bath potters and acrylic medium and screenprint medium. The media get mixed in equal parts by mass and then mixture is mixed in equal parts by mass with the underglaze powder.

(1 part acrylic medium : 1 part screenprint medium : 2 parts underglaze powder.)

20141109_124013

Media before mixing

20141109_124642r

After everything is mixed

As you can see I mix it on a glass plate and ideally I would use a muller but I don’t have one, so a pallet knife must suffice for the time being. Once it is mixed, it needs to be passed through a screen to make sure it is lump free and won’t clog the printing screen. Some spreading back and forth with a pallet knife does the trick and i keep the storage pot underneath so that it can drop straight into it.

20141109_125033

This results in smooth, lump free printing ink, which I store in a small self sealing plastic pot.

20141109_125114

Now for the screen.

The “normal” way to produce a screen is photographically with emulations and washing and lots of faff. My method is to use a vinyl cutter (Silhouette Cameo) to cut a sticker that I sick to the screen. Much easier and great for short runs but it does limit the minimum feature to about 2mm square so no half-tone printing. Most of the time my work is silhouettes so there are a number of options for generating artwork. I tend to use my Samsung galaxy note or my Motion MC-F5 running Ubuntu and krita (A combo that makes a great graphics tablet for £100-ish). For QR codes there are plenty of web sites. In any case the idea is to get a black and white image of what is to be printed. In the software for the Cameo there is a handy trace function (based on Potrace for those that are interested) which then generates a cut path from the artwork. For things like the floppy disc tiles I am printing here I just found a photo of a floppy and drew the cut lines on the image in the software. Finally I draw a tile sizes square cut line around the design and flip everything before sending it to the machine to cut. The result:

20141109_122516

To transfer this to the screen I use a low tack transfer paper:

20141109_122607

peel off the backing and stick it to the screen, then remove the transfer paper:

20141109_122735

finally, remove the bits I want the ink to come trough (in this case the grey window cover)

20141109_122826

As the outline of the vinyl is the size of a tile this makes registering it on the tile quite easy. To make sure the tiles always remain in the same place I have some thin plywood “L”s that are taped to the base board. the screen also sits on one 1/4” thick ply spacers in the hinges to bring it to the correct hight for the tile:

20141109_121906

(brown tape is just to stop leakage)

Brown parcel tape is used to mask off the rest of the screen and printing commences.

20141109_121916

They go onto a ware board to dry for a bit then, where necessary, get the second colour and stamped on the back.

.20141109_130154

Into a tile setter and then into the kiln (which I have put on wheels on a steel base so it can be loaded up next to where I am printing and wheeled off for firing) up to 960C in about 2 hours and then naturally cool

20141109_132447

This fires on the underglaze and burns of the acrylic binder. Next glazing.

To glaze them, I use Duncan pure•brilliance™ Clear Dipping Glaze. I have decanted some into a plastic box and got the viscosity to 18secs by adding a little water. To mix the glaze I gently slosh it from side to side as violent shaking introduces air bubbles.  To do the dipping I made some dipping tongs from welding wire

20141109_205327

20141109_205429

20141109_205453

20141109_205539

Once all the bubbles and limps are dealt with using a small paint brush they go back in the setter for another firing 1060C for an hour

20141109_211459

Result:

20141111_080202


Photographing

For the last year this has been the bane of my life!!

I pride myself on being able to do or work out how to do most things but getting good product photographs has to be one of the hardest skills I have yet tried to master. I certainly have not mastered it yet but at least can now get acceptable results.

When I started doing jewellery I used a pair of Ikea desk lamps to light pieces and I generally just used by bench as a backdrop and had the items in their boxes. (see here) This was good enough for the purposes of documenting work and the black backdrop hid a multitude of sins. However if you try photographing an item on its own you need a lot more work to get a good result.

Traditionally silver would be photographed against a black velvet background but fashions have changed and colours and white backgrounds are the norm now. The problem is that if you screw up photographing black, you get a (to quote Father Ted) very very very very very very very very dark blue, or some other dark colour, which to to most people looks black. There is no need to get black of the backdrop to be priests socks black, just lay peoples socks black. However, photograph a white backdrop incorrectly and you get a definitely tinted outcome. This problem is compounded buy the fact that  websites often have pure white backgrounds so the contrast effect exasperates the situation and the tint is even more noticeable.

I tried white. I really did.But getting a white backdrop is actually quite hard. White paper, for example is often a bit yellow, white fabric shows every speck of fluff or hair it manages attractor and white perspex is very easy to scratch and shows fingerprints. So what to use?

Well going back to my bench photography days, wood is a good backdrop. the problem is it either needs to be shiny and new or old and battered.

IMG_4312 tweeked

You can see here how a small mark really shows up on this Ikea chopping board. Unfortunately the life scars on this piece of wood were to few and far between to be any use. All I got were pictures with dirty marks in them. Further more the scale of the grain is too big.

IMG_4436 tweeked

Here I used the wooden floor in mu house. Well battered, but again the grain is wrong, too small this time. (This is Ash wood should you be taking notes)

IMG_4415 tweeked

(see for sale on Etsy)

This one is against the raw ash veneered ply of a box easel, the grain is too detailed.

IMG_4319 tweeked

And here we have birch veneered ply. This is too light and it is very hard to get the colour right, the grain is a bit indistinct and a bit too detailed.

Finally I tried an off cut of redwood.

hammered brooch 3

(see for sale on Etsy)

It has a good distinct and plain grain, it is quite yellow so any colour temperature adjustment doesn’t make it look fake and the know (the reason this bit of wood was cut off the end of a board) can provide some interest to the picture without being overwhelming. Further the graduation of grain lines means smaller things can be photographed on the left and larger things on the right.

It would appear that the perfect backdrop has a distinct texture that is about 1 order of magnitude below the size of the item and bit f colour to it.

With that in mind I went back to an old trick I had used a while ago, a cloth covered book.

hammered bar3

(see for sale on Etsy)

Which I think works well.

Now for lighting!

Natural light is good. But 150 yeas of electrical illumination technology is more controllable. I tried with natural light outside but this was a bit of a disaster. The blue sky reflected in the silver and made everything look blue and cold. A cloudy day would be nice but getting enough light on a cloudy day I  found a bit of a challenge and that kink of limits you to photographing during the day and only on days where the weather is right.

Solution: ebay!!! I ordered a light tent for all of abut £15 and with that and some flashes I got better results but still poor. So taking the old adage that you can never have too much light (hey they filmed nuclear bombs going off and you don’t get anything much brighter) I also bought for all of £100 a set of soft-box lights. So now my set-up looks like this:

IMG_5007

The side soft boxes have four 45w lamps in and the top one has a 135w lamp, all 5500K colour temp.

2 old books, my bit of wood and a plastic pot with some steel shot in it as a weight to hang the pendants from. The book that is standing up is up against a small wooden stand. Brooches are attached with a small blob of blu-tak when required. Hopefully I can now get everything photographed now.

Go look at my shop now and buy stuff to help me justify all this stuff. http://www.peterblacksart.com.

metal melting part 2

My investment casting supplies and I had a reason to make some metal all runny.

The short version is that my melting kiln mods worked.

The longer version:

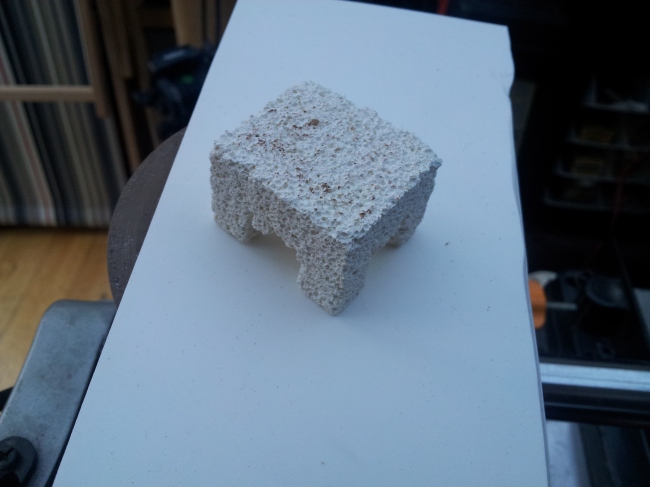
To ensure the crucible is not bleeding heat to the bottom of the kiln I decided to make a small stand from some insulation brick:Image

The space underneath makes sure that crucible is heated all round and also moves it more to the centre of the kiln.

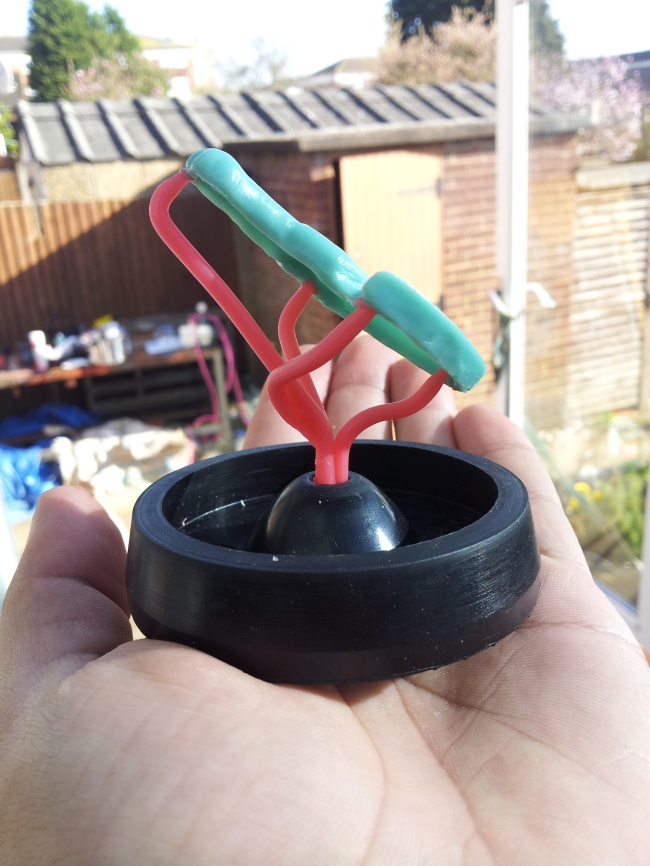
I didn’t take many pics of the casting process as this was my time doing lost wax casting and I thought that adding a camera to the proceedings would necessitate another arm and probably result in the thermal destruction of the camera.

However the wax original looked like this:

Image

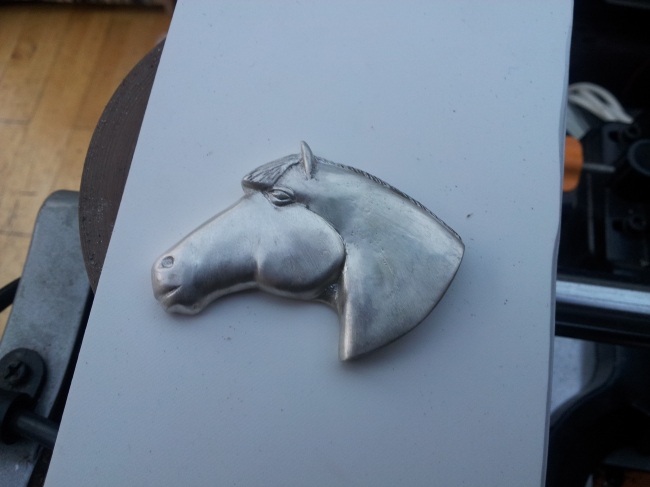
And the result (after some fettling) :

Image


melting metal

In attempt to do some silver casting I decided to buy a small electric melting kiln. I bought a new one off ebay of this verity along with a spare crucible and the protector paint.

It worked.

However, the crucibles show quite severe corrosion and start to fall apart after half a dozen melts. It should be noted that this is what the supplier suggested might happen but the extent to which it occurred was slightly alarming. The graphite that the crucibles are made from is a course grain variety and I wonder if this is a cheap material and in fact if they were made of fine grain graphite this would not be so much of a problem. The reason I am thinking this is that the disintegration seems to be arising from the material between the grains disappearing and the grains then falling off. Not wanting to spend the rest of my life buying these crucibles, I decided to modify the kiln to take an A5/0 salamander crucible.

Salamander crucibles are graphite/clay and this makes them far more oxidation resistant. They will last many years if cared for properly and should perform hundreds of melts before they need replaced and what’s more, they are cheaper than the disintegrating pure graphite ones!! The only problem with graphite/clay is it is porous to gas at high temperatures so careful degassing is normally required when using them with a flame (especially and oxygen rich flame as copper allows tend to absorb oxygen when molten and then release it when they cool leaving bubbles in the casting.) With an electric heating apparatus, this is of course not a problem!

To perform the modification three things were needed.

  1. A larger orifice to get the crucible and tongs in and out.
  2. new tongs
  3. a new lid.

This is how the top of the kiln looked when I started. The disintegrating crucibles sit on their top flange dangling their body into the kiln proper.

IMG_4216IMG_4213

After a little cutting with a coping saw blade (the brick is very soft so easy to cut.)

IMG_4226

Now we have a big enough hole to things in and out. A pair of tongs…

IMG_4221

These were made with a length of 2.5mm TIG welding filler rod. I made 2 “C” forms by heating a length of rod up and forming it round my ring triblet, then cutting them off and attaching them to a folded length of rod with my home made Pulse Arc Welder.

Finally the new lid for the kiln is simply half a thermal brick that I had left over from some work on my pottery kiln with 2 holes and another bit of welding rod as handle.

IMG_4227

I am now just waiting on my shiny new investment casting flasks and then I’ll fire it up. I will post what success if any I have.


Barrelling machine

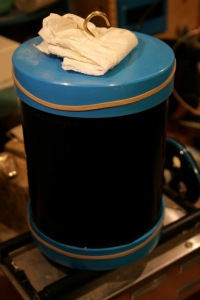
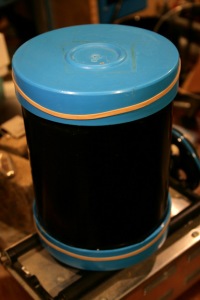
Due to my laziness and general engineers “there must be a tool for that, and why haven’t I got one” some time ago I bought a barrelling machine to do the bulk of my polishing. It is one of these kits and gives you most of what you need to get stuff polished, however, I found it less than perfect out of the box.

The main points I didnt like were the lack of traction twixt the rollers and the barrel and the fact that the nice airtight seal between the barrel and the lid made it quite hard to get them on and off.

The solution to the first problem; Rubber Bands!
The solution to the second problem; drill a hole in it!

Look:

modified barrel odified barrel without screw

When everything is dry then the barrel will rotate quite happily, but when a tiny bit of moisture  gets on the rollers, then one end looses traction and the other slips off and your barrel goes skidding across the worktop and off onto the floor. As this thing uses water it is not uncomon for it get damp when you are filling/emptying it so this is a bit of a design flaw. To help alleviate this a pair of post office standard rubber bands of the type dropped by ones local postie as he does his rounds are very good for getting a grip on the rollers however there are still issues with this. Firstly, they don’t like large quantities of water and will still slip if there is a leak or a stray drop around and secondly, they will wear out after a few hours of use (but hey – the postman will probably leave you some on your doorstep). My next step for this will be to find a better material to use, like self amalgamating tape perhaps…, and to make a couple of arms to catch any escaping barrels (you may notice that some other designs of machine a cavity the barrel can’t get out of easily) or rebuild it with the rollers further apart so the CoG of the barrel is lower and therefore needs to be lifted further to escape.

For the other problem I found that putting the lids on and getting them off was a right pain as the water-tightness of the barrel  was just a hindrance. The first solution was to drill a 0.5mm hole in the centre of one end cap (the one I would always take off) and not fill it more than half full. This doesn’t not work because the foam created by the tumbling process just resulted in water getting out though the hole. since there wasn’t a lot of water getting out I taped a bit of fabric over the hole to absorb this moisture. This worked ok but after a long period of use the cloth would get saturated and need replacing. The solution I am using at the moment is to screw a screw (well, cup hook since it is easer to undo and do up by hand) into the hole I made so that it fills most of the hole while in use but can be removed before putting on to taking the lid off. Just to catch any further drips, I put the screw through a piece of kitchen towel, so any time it gets to wet I can simply replace it.

After all that I can chuck things in the tumbler for a couple of hours and they come out all nice and sparkley, and what’s best, No work on my part, I can keep making new things.

On the bench

Currently on my bench I have more or less finished this pendant.

spacefram pendant

It is a prototype to try out the design more than anything. The idea is that it would be worn with a low cut top and would compliment and accentuate the wearers natural curves. Artistically, it is a combination of mechanically straight and organically curved lines. and from an engineering standpoint is is practically a space frame apart from the trapezoidal frame at the back making it very rigid. I had had the idea for this a long time ago and made this pendant but it was very flimsy and likely to get bent. by adding the frame inside it adds both more interest and much more durability.

Halmarking

After 5 years of making small bits of silver on and off and never making anything big I have started selling properly. There is requirement for items over 7.78g to be hallmarked by law if they are to be sold as silver and this must be done at one of the 4 assay offices. After a post on the Cookson Gold forum about which assay office was best to use, I have elected to use the London office. Paperwork is in and I have revived the email that it is all progressing nicely.

I already have 3 pieces waiting to go and get stamped.